Benefits of Using A/B Testing with React Native Javascript

React Native is a framework created by Facebook that allows developers to create mobile apps using JavaScript and React. The framework compiles the JavaScript code into native code thus causing the app to feel like any other mobile app that’s available on the Google Play Store or Apple’s App Store.
When writing applications in React Native, team’s will find that they can save quite a lot of time. Not only during development due to the shared codebase, but also when initially starting off development. Some teams may already have a front-end engineer working on their web platform, these engineers can easily transition into mobile development through React Native, thus circumventing the need to hire Android or iOS specific developers.
In addition, rapid A/B testing has been a little strenuous on mobile applications in the past due to Apple or Google’s release cycle, however, experimenting has never been easier and faster on React Native. Technologies that allow teams to push updates and releases over the air enable React Native apps to push out experiments faster than ever before. Teams may even be able to get to a stage where every feature that is pushed out is methodically tested between different variations. This is in an attempt to ensure that data-driven decisions are behind shaping a feature into its perfect form, based on the results from various experiments.
I’ve set up a React Native application and created a quick A/B test for it, all in under 15 minutes which is available to watch here: Live React Native Masterclass.
Initializing a React Native App
Getting set up with a React Native application is fairly simple. The React Native documentations outline the necessary steps that need to be taken to set up a project. For more details, watch the initialization process in chapter 1 of the video.
Configuring the Taplytics React Native SDK
In order to configure the Taplytics React Native SDK, start off by navigating over to the Taplytics documentation and running the yarn add command. Once the yarn installation is complete, necessary steps will need to be completed on both the native iOS and Android side of the React Native application.
In order to initialize the SDK on iOS, simply follow the steps outlined within iOS initialization docs. For the purposes of the demo, the SDK was only configured on iOS however the steps to configure the SDK on Android can be found here.
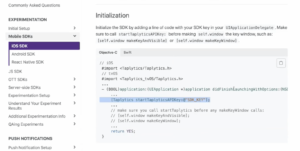
Initializing the SDK on iOS simply requires that the startTaplyticsAPIKey method is invoked with the SDK key within the didFinishLaunchingWithOptions method in the AppDelegate file.
A/B Testing Experiment Demo
An experiment called “Masterclass Experiment” was created through the Taplytics Dashboard and it was distributed to both iOS and Android devices seeing as React Native applications are built for both platforms. A code variable labelled isDarkMode was also initialized within the experiment, this variable will be fetched within the app and utilized to determine the color scheme of the application. For more details, you can watch the demo in chapter 2 of the video.
To recap what was covered during the demo:
- A fresh React Native app was initialized by following the provided React Native documentation.
- The Taplytics React Native SDK was installed and configured as outlined within the Taplytics documentation.
- The “Masterclass experiment” was reviewed, taking note of the dynamic code variable that would be utilized. The creation of the experiment is typically done by the product or marketing team within an organization.
- Finally, by following the Taplytics React Native SDK documentation, the value of the isDarkMode variable was fetched and used to turn the app’s color scheme from light to dark mode.
How to Use Taplytics React Native Hooks
React hooks are essentially functions that let you “hook into” React’s state and lifecycle features within a functional component. In the past, in order to have a stateful component it would need to be a class-based component. However, now with hooks functional components can also hold state.
I used the use state hook in the demo that I covered above. With that hook, we stored the value of our dynamic variable, and we told React we’re storing this value inside of a state variable. To highlight how to use Taplytics React Native hooks, I created a demo app and highlighted how to create an A/B test on your app. You can watch it in chapter 3 of the Masterclass.
We also used hooks during the demo. We went from light mode to dark mode really quickly. You could also create your own hooks and encapsulate any kind of business logic that you have inside of that hook for reusability across multiple different components and screens.
That will just allow you to take that chunk of code and use it across multiple different components while only having to write the logic once. This also makes working and testing with React a lot easier since our hooks have a singular task that need to be tested for it.
At Taplytics, we wanted to make it even easier and faster for developers using our SDK to get going. We manage all the state and lifecycle updates so that you, as an engineer, spend less time instrumenting the SDK and more time developing your apps.
Running experiments in your apps is not only easy but can help your team make product and business decisions. When creating multiple variations of your app, you can pick your KPI and after letting the variations run for a while, you’ll see which one performs better. From there you’ll have a “winning” variant.
QA Best Practices
One of the important things to keep in mind before you start implementing your experiments is to get all of your events set up through any of the Taplytics third-party integrations or leveraging our native Taplytics events. You should also always have a specific KPI in mind that you’re looking to optimize along with the expected outcome for that KPI.
You also want to ensure all your goals are firing correctly. This means going through each event and making sure that you’re logging the right values and everything’s coming through as expected. This is important since when you’re delivering and collecting data from the experiments you run, you want the data to be accurate in order to make business or product decisions.
Another thing to really keep in mind is segmentation. You want to be mindful of who you should be targeting. A simple analogy I like to use on segmentation is how wide of a net you want to cast. At Taplytics we always encourage our customers to start narrow before going wide. You want to constraint it so that it goes out to internal users first or internal dev devices which you can do by setting custom user attributes.
This process should always be baked into your business processes and culture leveraging the purpose-built QA tools that we built so that you’re seeing the cause and effect of your experiments and making sure that they’re being delivered and behaving as expected. Also using our “get running experiments in variations” method will allow you to log the results of your experiment. It will let you verify that internal dev devices are fetching the correct values of the variations that you’ve set up in your experiments.
Finally, setting it live to internal users before releasing it to production is key. You can leverage the Taplytics rollout feature where you’re able to have it go to a smaller subset of users, ensuring that data is flowing in correctly, and there aren’t any crashes. Then you have it roll up to everyone once everything is vetted and verified.
It’s really fast, fun, and easy to implement Taplytics. If you’re looking to explore experiments and feature flagging with Taplytics feel free to reach out – we’d love to chat!