Automated Campaigns for Taplytics’ Smart Push

A year ago we officially launched the Taplytics Smart Push platform to give our clients even more ways to optimize their users’ experiences. We launched Smart Push because we believed that the union of in-app, dynamic A/B testing and contextually aware push notifications would allow our clients to connect better with they’re users. This also let us help our clients address the very real challenge of delivering the right message at the right time to their users.
Taplytics is proud to announce: Automated Campaigns for Smart Push.
Over the past year, our clients have been able to leverage Smart Push to drive great results and today we’re excited to take our Smart Push platform to the next level with Automated Campaigns.
Our new Automated Campaigns feature allows mobile developers and marketers to deliver rich push notifications based on users’ in-app and real-world behavior without the need to write even one line of code.
Zoe Di Novi from Wattpad has said, “We’ve been using Taplytics’ Smart Push for some time now with great results. We can’t wait to add the automated capability to our mobile strategy.”
Automated Campaigns allow marketers to do things like creating shopping cart abandonment campaigns to encourage more purchases or location-based messages that encourage users to visit a pop-up shop. These capabilities, all without code, open up a whole world of possibilities for creating rich mobile experiences.
The Feature Set
Campaign Duration
Taplytics’ Automated Campaigns are delivered based on actual user behavior, this means there won’t be one set time that pushes will be delivered. Because of this, it is important to set a campaign duration. A duration can be as long or as short as you’d like. If you are creating an abandonment campaign, it might make sense to let it run indefinitely. If your campaign is targeting in-store users for a special weekend discount, you may only want to let it run for a handful of days, while the discount is applicable.
Setting your desired duration is simple. All you have to do is pick a start and an end date via the calendar tools right on the dashboard. Once you’ve picked the relevant dates you’re all set.

Targeted Segmentation
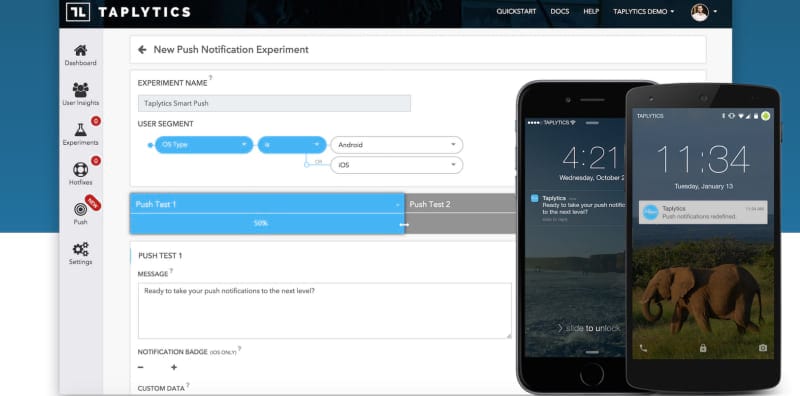
Just like all of the other campaign types you can create using Taplytics’s Smart Push platform, Automated Campaigns provides the ability for rich segmentation. Taplytics allows you to segment the audience for your push notifications based on the following criteria:
- App Version
- App Build Number
- OS Type & Version
- iOS Device Types
- Android Screen DPI
- App Language
- New vs. Returning Users
- Session Count
- Days Since Last Session
- Days Since Sign up
- City
- Region
- Country
- Age
- Gender
- Or any other custom user data
Not only are the options for out-of-the-box segmentation filters comprehensive, but they can also be used in any combination, to ensure that the audience receiving a push notification is getting content that is highly tailored and highly relevant.
Triggers
The Right Place at the Right Time
Communicating with the right user doesn’t matter if you’re trying to communicate with them at a time that isn’t relevant. There are hundreds of articles talking about the optimal time of day to send a push, but the only true optimal time to send a push is when you know that the content is something that your user wants to see. This is the core problem that is solved by Taplytics’ Automated Campaigns. Fundamentally what automated campaigns are all about is delivering pushes based off of in-app or real-world user behavior, meaning your pushes can be sent right at the exact moment necessary to deliver a remarkable and delightful experience.
In Taplytics’ Automated Campaigns you have the ability to set two kinds of behavioral triggers, Fire Triggers and Kill Triggers.
Fire Triggers

Think about Fire Triggers as the action a user takes that queues up a potential push for delivery. In the example of a cart abandonment campaign this would be adding an item to the cart. To set a trigger on an add-to-cart action all you have to do is select the Event Fire Trigger and choose the relevant event either from Taplytics events you’ve already created or from any 3rd party analytics events you’re already tracking.
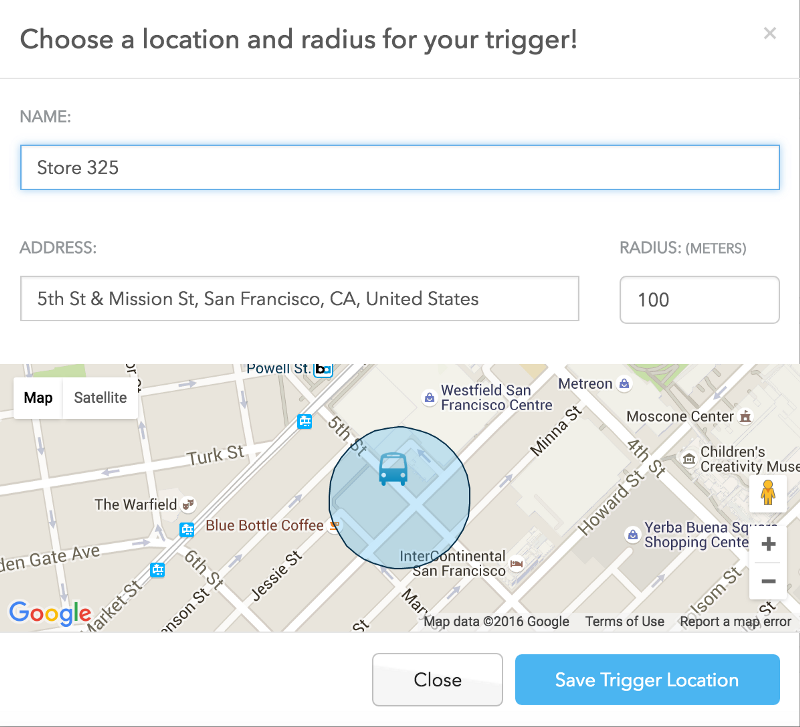
If on the other hand, you’re looking to do something like the in-store discount example mentioned earlier, you would choose a location-based Fire Trigger and set it for when a user enters a 100-meter radius of your store.
Fire Triggers can be made up of more than one event. They can be any combination of in-app and location-based events, giving you endless possibilities to create pushes based off of rich user behaviors.
Kill Triggers

Where Fire Triggers act to queue up a potential push, Kill Triggers act to remove a potential push from the queue. This is just as important as Fire Triggers because it allows you to be certain that the user has taken the actions that you want before you commit to sending a push that potentially isn’t relevant.
Going back to our previous examples, in the case of a cart abandonment campaign, you might use the actual purchase event as a Kill Trigger because it wouldn’t make sense to send a user a message about coming back to complete a purchase that they already completed.
As for the in-store discount example, if you only want to send the notification to users who actually enter your store, you would make the Kill Trigger be the act of exiting the area 100 meters around your store.
Potentially the most important part of Kill Triggers is the time option. Whether it’s in-app or real-world actions, the time frame is how long you’re willing to wait for the Kill Trigger to happen before you send the queued push. If it’s entering a store, you might set the timer to 5 minutes, so if someone enters and exits your store in less than 5 minutes you wouldn’t send them a push. If it’s cart abandonment, you might set the timer to 30 minutes, so if someone doesn’t complete a purchase within 30 minutes of adding an item to the shopping cart, you’d go ahead and tell them to come back.
Push Controls
The extent of control and specificity for your campaign doesn’t just stop with the right user in the right location at the right time. Timing isn’t just about the first time a message is pushed, it’s also about how often you might want that same push to be sent to the same user. Here, Taplytics allows you to set specific wait times for pushes to be sent and specific intervals before another push will be sent.

Taru Bhargav, from AppVirality, cites push fatigue as one of the many reasons that app users opt out of push notifications. Sending repeat messages, especially if the content is not valuable or relevant to the user, may not only drive a user to opt out but may force them to uninstall completely.
When it comes to the push delay, if it’s a location-based trigger like that of the in-store discount the delay may be minimal or it may even be set to 0 so you can be sure the user got your message while they were in the store. If it’s the cart abandonment campaign, we would set the delay to 24 hours, so the user doesn’t get the sense you’re monitoring their every move (even if you are).
As for the time between pushes, think of it as your anti-spam control. Some pushes should only be sent once per campaign. In that case set the time between pushes to be the length of the campaign itself. Some other pushes may be relevant to go out any time an action is taken. In that case set the time to 0. Whatever the scenario, you can be as specific as you’d like to get the quantity of pushes delivered to a user, just right.
Dynamic Message Content
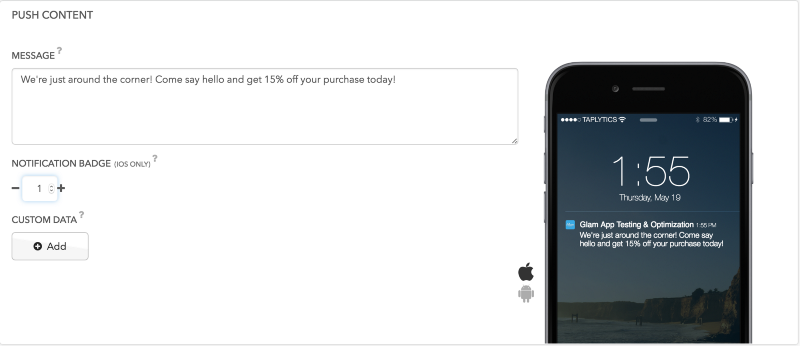
The last part of Automated Campaigns is setting the content. This part is exactly the same as every other push campaign, but it can take on a whole new meaning in the context of an Automated Campaign. By leveraging dynamic text, you can mention the product the user left in their cart right in the message. You can even thank them for visiting the specific location they just walked into.
Because you’re delivering your push notifications based off of hyper-specific user actions, it’s worth it to take the time to create truly customized messages. If you don’t, you might just be leaving a lot of potential value on the table and giving your users a less-than-optimal experience.

How to Use It
A “one size fits all” solution for communication doesn’t exist, no matter the medium. When it comes to pushing a piece of communication to the home screen of your valued user, it’s crucial to tailor the communication as much as possible.
With Automated Campaigns for Taplytics’ Smart Push, you can customize your notifications for each individual user based on their preferences, location, and behaviors. We’re so excited about the possibilities for combining this type of rich push notifications with in-app A/B testing to create experiences that will truly delight users en masse.
